Dexibell VIVO P7 Digital Piano — Silent middle C
Table of Contents
The Dexibell VIVO P7 is a sample-based, fully polyphonic digital piano. It uses a Fatar TP/100 LR keybed, which features 88 weighted keys, hammer action and triple key contacts to ensure maximum fidelity in the action and in the velocity response.

This stage piano is a very robust machine and is very well suited for live applications. Sometimes though, intense live usage and exposure to moisture and heat can cause damage to the keybed rubber contacts and make some of the keys behave incorrectly. The resulting behavior can be missing dynamics, missing NOTE ON or NOTE OFF messages. This phenomenon happens usually on the most used keys. In the case of this particular instrument, the affected key was middle C — what did I just say?
Key Contacts #
The part of our interest is a rubber strip of 12 contacts (13 for the last octave). Each of the contact presents three small carbon-charged rubber tips, one by one offset by a very small amount in height. When the player strikes a key, the three small nubbins press in a fast sequence against corresponding contacts on the keybed PCB and the instrument CPU reads the key press.
The difference in height of the three contacts allows for very high quality sound dynamics. In fact, the CPU reads the speed of the key stroke based on the delay between the sequential contacts of the three rubber tips and converts this into MIDI velocity, digitizing the player expressivity with high fidelity.
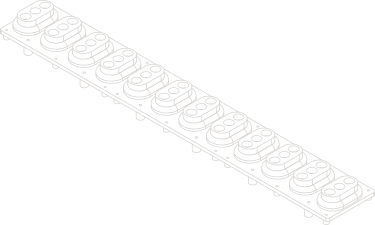
Since the Fatar TP/100 keybed is still in production, key contacts are very easily obtainable from an official spare parts dealer — and since I live in Italy and Fatar is an Italian company, this is going to be a piece of cake.
Replacement Procedure #
Disassembly & Keybed Extraction #
The initial stage involves disassembling the instrument flanks and front panel. Once the front panel is loose, the ribbon connector that links it to the main board can be disconnected and the front panel can be put aside.
After the front panel is off, unplug the three ribbon cables that tether the keyboard and the aftertouch bar to the main board. Remove also the screws that fix the central metal bracket to the instrument chassis.
Then, the instrument must be put face down. In this position all the mounting screws of the keybed can be easily removed from the bottom of the chassis. When all the screws are undone, the back chassis should come up freely and leave the keybed in the upside-down position.
Key Removal #
To avoid a complete disassembly of the keybed, to access the key contact strip all the keys of the affected octave must be removed carefully. In order to to this, a controlled and steady pressure must be applied from the back of the key, where the key grabs on the back mounting rail. The key will pop out and will be possible to remove it by pulling it up.

Contact Strip Replacement #
The affected strip can be removed just by pulling it away. All the small centering cylinders will pop out of the keybed PCB and all the contacts will be exposed. This is a good moment to gently wipe the contacts on the PCB with a cotton swab slightly wetted with isopropyl alcohol.
The positioning of the new contact strip is quite delicate. With a small hex screw or with an unbent paper clip all the small rubber cylinders must be refitted to the PCB holes. This operation is a little bit fiddly because if too much pressure is applied there is the risk of rupturing the rubber membrane that holds the strip together.
Reassembly Steps #
When the contact strip is completely flush on the PCB, all the keys can be reinserted and clipped to the back rail ot he keybed. While remounting the keys, it is necessary to carefully reintroduce the mechanical cams of the key hammer action on the key side slots.
After all the keys are placed back on the frame, rotate back the keybed to an upside-down position and reposition the back chassis on top of it.
Reinsert the ribbon connectors on the main board, reattach the center bracket to the chassis and reconnect the front panel ribbon cable.
Finally fasten the front panel back and reassemble the keyboard flanks.
Final Test #
Simply playing all the keys of teh affected octave tests out if the notes are correctly read and played. If a thorough test is needed, it is possible to connect the keyboard to a DAW and check the MIDI velocity response of all the notes and verify its consistency in the octave and between different octaves.
This type of maintenance is key — pun intended — in the life of a stage piano. And fortunately it is a very quick and easy routine. Don’t mistreat you keyboards. Keep ’em clean and dry!